

Stratégie
The rules of Othello are fairly simple to grasp. Likewise is the object of the game. Fortunately, the way to achieve that goal is more complicated. The next list covers some othello basics and misconceptions, which, once known, can improve your game.
Meer info, applets and several other tips and tricks can be found on the site of Steve MacGuire.
- Othello - an animated guide
- Lots of different openings and methods of play
- Tricks and traps: stoners, boscov, swindles, corner attacks...
- Different wipe-outs
- Some interesting games
- Happy Start - een method to test basic openings
1 "less is more"/Maximizing
Since the goal is to end up with more discs than your opponent, many beginners try to flip as many discs as they can every turn throughout the game. This, the most basic of all strategies, is seriously flawed and will not win you any games. What almost always will happen is the game will reach the end looking more or less like figure 1, the maximizing player having almost all of the discs until the last few moves of the game when it all changes.
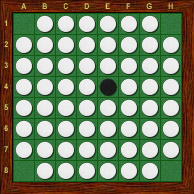 figure 1
In this classic example, black is left with all four of the remaining moves, ending the game in 40-24 in black's favour. So this 'drastic' case shows you that in most cases it isn't good to be to greedy.
2 Stable Discs
'Enclosing' a disc isn't always possible. The corners of the board for instance, can never be flipped. This also applies to any neighbouring discs of the same colour along the edge. These unflippable discs are usually referred to as stable discs. If one manages to get a lot of stable discs in a game, a win isn't far away.
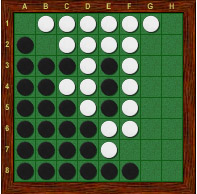 figure 2
In figure 2 black has 22 stable discs and is clearly winning the game. So as rule of thumb, do not let you opponent get a corner unless you have a very good reason to!
3 X-Squares and C-Squares
The squares next to the corners are so important in Othello there are specific names for them. The X-Squares are the from the corners diagonally adjacent squares (shown with black discs in figure 3) while the C-Squares are the adjacent edge squares (shown with white discs).
 figure 3
As soon will become apparent, these squares should always be played with caution since there are numerous ways your opponent can take advantage of it (see "2_stable discs").
4 Wedges
Placing a disc between two of your opponents discs is called wedging.
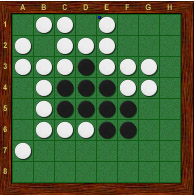 figure 4
As seen in figure 4 this can be devastating. White has just played E1 and created a perfect wedge for black at D1. After black has played D1, white can not stop black from also taking the corner! Looking at column 1, black also has the opportunity to create another wedge where white has left three empty squares. If black was to play A4, threatening to take the corner, white's usual response would have been A5. However, since white has left three empty squares, this will create wedge for black at A6 giving him access to both corners.
5 Unbalanced edges
Wedges and unbalanced edges are topics closely tied together. In figure 5, row 1 is what is called an unbalanced edge.
 figure 5
Having these types of edges usually give your opponent the chance to wedge in when you eventually decide to take the unbalanced corner. In this example white is about to do just that! If white plays G2 he is indeed giving away the H1 corner to black, but he is at the same time setting up a beautiful wedge for himself at G1! After white has played his wedge at G1, black is forced to pass 6(!) times while white plays all the remaining moves on the board: G1, A1, A8, H8, G7, B2 and finally B7 to win the game 57-7. Had black just had a disc on G1, leaving no possible wedges for white, white would instead have lost the game 11-53. Unbalanced edges can be devastating!
6 Newbie trap
The danger of playing the C-Squares is illustrated in figure 6.
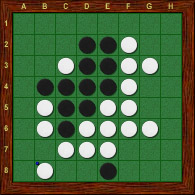 figure 6
White has played the C-Square at B8, effectively giving the A8 corner to black. All black has to do now, it play C8. White will not be able to protect the corner with D8, since black then will flip the whole edge with the move at A8. This is a fairly common mistake made by beginners. Experienced players will never play a move like that unless they have a well thought out plan.
7 Mobility
As mentioned before, playing squares adjacent to the corners can often be a bad thing. Naturally, your goal should then be to make your opponent do just that! However, as long as your opponent has any other legal moves we have to assume he will play one of those instead. This is where your mobility comes into play. At any given moment both players have a certain amount of legal moves to choose from. The player with the larger number of options is said to have greater mobility.
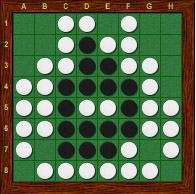 figure 7
In figure 7 it's black's turn to play. As always, it's just as important to look as much at your opponent's possible moves as at your own. Black realizes that white only have three possible moves of which all but E1 are horrible. Had it been white's turn E1 would have been white's choice and white would have been safe for the moment. But, since it's black's turn now, black has the possibility to play that move himself, reducing white's options to only the two bad moves! White is then forced to choose between his two horrible moves, only to be forced to play the other move his next turn after black takes the corner. In this game black successfully reduced white's mobility so much that white was finally left with nothing but bad moves. Mobility is the key to winning in Othello! Having greater mobility than your opponent gives you the opportunity to dictate how the game progresses. You can then choose, play by play, what moves you want to be available for the other player. Another question now arises: What moves do you actually want your opponent to play? Towards the end of the game it's fairly easy, as we saw in figure 7, but how about when there are no clear game winning moves like in that example? The answer is very simple: You should constantly be looking for ways to either increase your own mobility, or reduce your opponent's! Examples on how to gain mobility throughout a game will be covered in greater detail later on.
8 Frontiers
The discs adjacent to the empty squares on the board are commonly referred to as frontier discs.
Looking again at figure 8 we notice how white has no legal moves to the south. White is said to have all the frontier discs on this side. Black on the other hand has legal moves on all four sides of the board giving him quite a few viable options for his next move. Thus should you always keep in mind whether or not the move you are considering reduces your mobility by flipping frontier discs to your disadvantage!
 figure 8
9 Quiet moves
A move that flips no frontier discs at all is called a perfect quiet move. Finding one or two perfect quiet moves can often be all it takes to turn a close game into a clear victory. In figure 8 black has a perfect quiet move at H6. After playing H6 black will still have two more very nice quiet moves to play along that same edge. While black is playing these three quiet moves white is forced to extend his frontier every turn eventually being forced to give up a corner, and the game, to black.
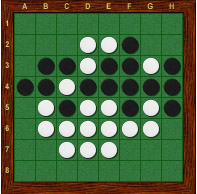 figure 9
10 Tempo
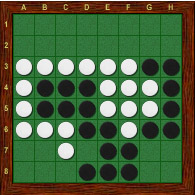 figure 10
In figure 10 it's black's turn to play. Black do not wish to play in the north creating new moves there for white since white currently is only able to play in the south. If black plays C8, white will play D7 forcing black to open up the north against his will. In this example black has a chance of avoiding this by playing twice in the south while only letting white play there once. If black plays D7 instead, white answers with C8 and black ends the play in south with B8. Black has now effectively won a tempo in the south. Thanks to that tempo black never had to open the north. Instead, white is now forced to give a corner to black!
11 Creeping Along The Edges
An effective, but somewhat dangerous strategy of reducing your opponent's mobility is called creeping along the edges. Using this strategy one attempts to keep playing quiet moves along the edges until the other player has to sacrifice a corner. The danger of this strategy is that the longer this takes, the harder it will be to find new moves along the edges. If the other player never gets forced to sacrifice a corner the creeping player will usually find himself having unbalanced edges and constantly decreasing mobility.
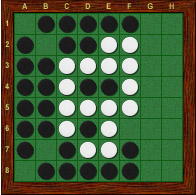 figure 11 figure 11 |
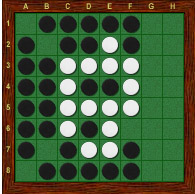 figure 12 figure 12 |
In both figure 11 and 12 black has tried to creep along the edges. Despite the nearly identical positions, in figure 10 black is successful in his creeping and winning the game, while in figure 11 the creep has failed and black is losing!
12 Parity
Since there are an even number of squares on the board and black always starts the game, per usual white will get the last move of the game. Since having the last move is obviously a good thing, black will want to change this outcome to his advantage. This can be done by forcing an odd number of passes during the game.
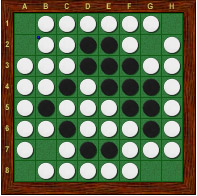 figure 13
As can be seen in figure 13, this doesn't solely apply to the last move of the game, but also the last move in every region of the board. Fortunately there are easier ways than forcing passes to turn the parity to black's favor. The most common approach is for black to try to create a region with an odd number of squares that white can not play in.
 figure 14
As seen in figure 14, this completely turns the game around giving black parity in all the other regions. At the end of an othello game parity can often be more important than both a corner or an edge.